
“Is this really how the scene looked?”
“Is this a real image or is it photoshopped?”
“Where do I have to go to see this with my naked eyes?”
These are questions I get asked quite often. My answer normally is that it is impossible to see with our naked eyes what a modern camera can record, as the human vision cannot do long exposures and is very limited in low light. I often add that the very purpose of astrophotography is to show structures that the human eye cannot see and that there is no quality astrophotography without post processing.
Actually, photography without processing has always been a myth. Even in the days of chemical film, images were processed in the darkroom, sometimes even heavily. Todays image propcessing software is a digital darkroom with some added possibilities and many processes still have the same names as their analogue counterparts from the good old days of chemical film processing.
Before I drift too far off topic, though, let’s look a bit deeper into the difference between an astrophotograph and how a stargazer can see the Milky Way.
Light pollution
We first have to talk about an rather sad topic: Light pollution.
Less than 100 years ago, everyone could look up and see a spectacular starry night sky. Now, millions of children across the globe will never experience the Milky Way where they live. The increased and widespread use of artificial light at night is not only impairing our view of the universe, it is adversely affecting our environment, our safety, our energy consumption and our health.
If you want to dwelve deeper into the topic, or want to know how you can help to fight light pollution, I highly reccomend to follow the links provided above and to visit or join the International Dark Sky Association.
The important thing to know for this article is that you will not be able to see the Milky Way from a light polluted site, like a city or bright suburb. In the illustration below you can see how light pollution washes out all contrast and detail in the sky.
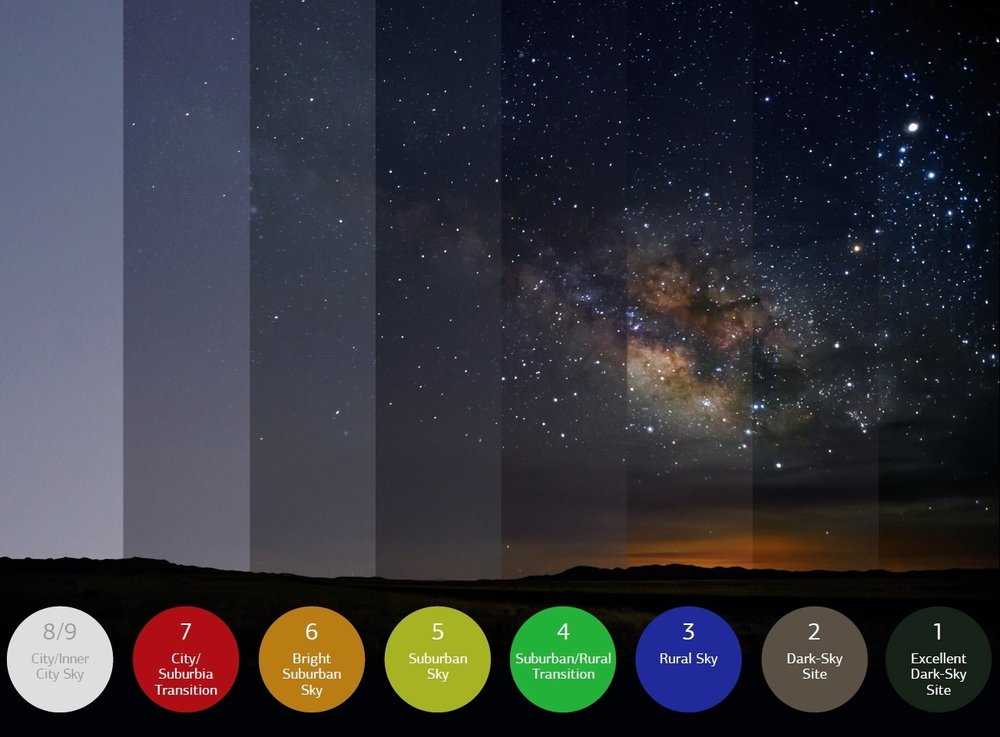
Light pollution can be measured in different ways, but the bortle scale is the most convenient way of measuring the sky quality at a specific location. As you can see in the illustration above, the bortle scale has nine levels with class 9 being the most extreme amount of light pollution and class 1 corresponding to totally pristine skies.
The different bortle classes have assigned colors, which are used in light pollution maps. These maps are a great tool to make sure that your stargazing trip takes you to a reasonably dark place. They can be found online on various sites, like e.g. lightopllutionmap.info or darksitefinder.com, where you even get some tips for easily accessible observation sites.
While it may be possible to see the Milky Way core from a bortle 5 zone, the view is rather underwhelming. I highly reccomend to go to a bortle 4 zone or better to avoid being disappointed. The darker, the better and if you cannot go to a truely dark zone, try to find a place where you face towards a darker zone when looking towards the Milky Way core.
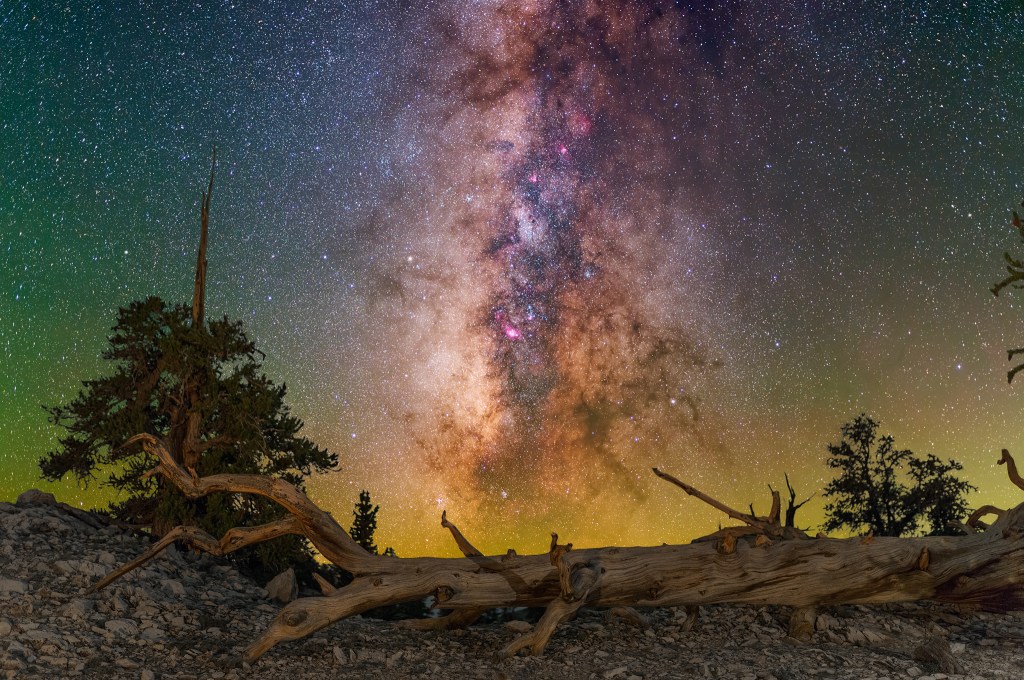
In this article, I use an image from Ancient Bristlecone National Monument in Eastern California, captured in 2017. This is a bortle class 2 zone with only minimal light pollution coming from the town of Bishop in the West. The glow is very faintly visible on the lower right side of the image.
After this excursion into the topic of light pollution, let’s see what else affects how we can see the Milky Way with our own eyes.
The human vision – rods and cones
The full structure of the human eye is beyond the scope of this article, but it is important to know that the human vision works differently than a photographic camera. Similar to the photodetectors on a camera sensor, our retina contains photoreceptors. They are a specialized type of neuroepithelial cell that is capable of absorbing light and converting it into an electrical signal in the initial stages of the vision mechanism, a process known as photo transduction. Photoreceptors are packed tightly together, allowing a large volume of light to be absorbed across a small area on the retina.
Photoreceptors in the retina are classified into two groups, named after their physical morphologies. Rod cells are highly sensitive to light and function in night vision, whereas cone cells are capable of detecting a wide spectrum of light and are responsible for color vision. Rods and cones are structurally separated.
Rods
Rods are cylindrical shaped photoreceptors. They are more numerous than cone cells, with an estimated 92 million rod cells located in the human retina. They function best in low intensity light and are thus responsible for vision in dimly lit surroundings, such as when stargazing at dusk. Rod outer segments are cylindrical in shape. Rod cells are located across the retina except at the center. The density of rod cells increases as you move away from the center of vision, reaching a peak and declining again towards the periphery. Rod vision provides high sensitivity to light, but with relatively low spatial discrimination and no ability to distinguish different wavelengths of light. This is why they are not capable of detecting different colors. Compared to cone cells, rods have poor visual acuity, or ability to distinguish fine detail.
Cones
Cones are conical shaped cells that operate best in high intensity lighting and are responsible for the perception of color. There are far fewer cone cells in the human retina compared to rod cells, numbering approximately 4.6 million. Cone outer segments are generally shorter than that of rods and, as their name implies, are often conical. The three different proteins that bind to light-reactive chemicals located in the cone cells account for their ability to detect different wavelengths of light, producing color vision. The dense packing of cones at the center of vision allows maximal resolution.
Dark adaption
In order for humans to transition from day to night vision they must undergo a dark adaptation period in which each eye adjusts from a high to a low luminescence “setting”, increasing sensitivity hugely, by many orders of magnitude. This adaptation period is different between rod and cone cells and results from the regeneration of photopigments to increase retinal sensitivity. Light adaptation, in contrast, works very quickly, within seconds.
The human eye can function from very dark to very bright levels of light; its sensing capabilities reach across nine orders of magnitude. This means that the brightest and the darkest light signal that the eye can sense are a factor of roughly 1,000,000,000 apart. However, in any given moment of time, the eye can only sense a contrast ratio of 1,000. What enables the wider reach is that the eye adapts its definition of what is black.
The eye takes approximately 20–30 minutes to fully adapt from bright sunlight to complete darkness and becomes 10,000 to 1,000,000 times more sensitive than at full daylight. However, it takes only approximately five minutes for the eye to adapt from darkness to bright sunlight. This is due to cones obtaining more sensitivity when first entering the dark for the first five minutes but the rods taking over after five or more minutes. Cone cells are able to regain maximum retinal sensitivity in 9–10 minutes of darkness whereas rods require 30–45 minutes to do so.
Dark adaptation is also faster and deeper in young people than the elderly.
Consequences for night vision
Now that we have a basic knowledge about how the human vision works, let’s see what this means for the naked eye view of the night sky.
- As the color blind rods are responsible for night vision, a naked eye view of the night sky will be black and white, except for some bright stars who’s light is bright enough to stimulate our cones.
- Another interesting fact is that rods are not located at the center of the retina. This means that you will not see faint objects if you look directly at them. This is a well-known fact for seasoned visual astronomers and stargazers, who use averted vision, a technique for viewing faint objects with peripheral vision. It involves not looking directly at the object, but looking a little off to the side, while continuing to concentrate on the object. This requires a bit of practice, but often makes the difference between being able to see an object or not.
- The third consequence of the fact that we only see with rods in low light is that the image will not be as sharp and detailed as a daylight view.
- To see as many details as possible in the night sky, you need time to adapt your eyes to the darkness. This takes at least 30-40 minutes and any bright light will almost immediately reset your dark adaption to zero. Be therefore careful with shining flashlights or headlamps and if you absolutely must use a light, use a red light, which has less impact on night vision.
- Photographers will most probably never be fully dark adapted, as they have to check their LCD displays from time to time, thus destroying their dark adaption. BTW: Photographers will also not be happy if you use a red light while they are shooting, as red light is much harder to remove in post processing, especially when shooting with an astro-modified camera, which is more sensitive to red light.
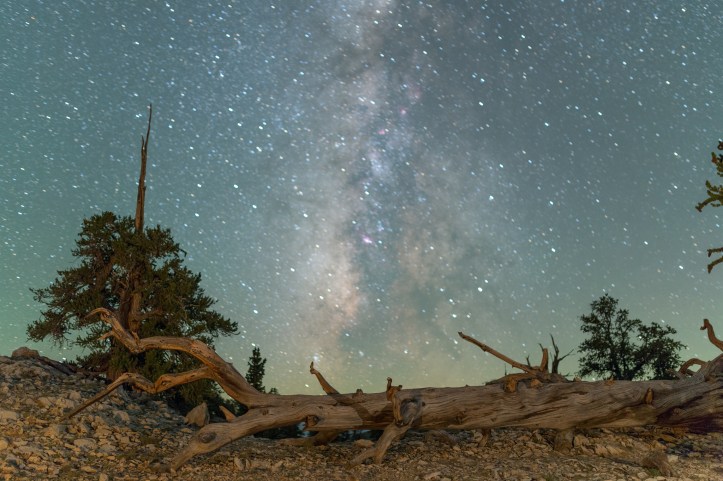
The naked eye view
We have learned that the naked eye view highly depends on dark adaption, age and ambient light at the observing site. I nevertheless tried to produce what I think is a reasonably accurate view of what I can see at a dark sky site when fully dark adapted.

This obviopusly doesn’t correspond to how nightscape images look and it also isn’t how a camera ‘sees’ the scene.
What the camera can see
A camera has several advantages compared to human vision. It not only is capable of recording colors in the dark, it can also do long exposures and, contrary to human dark adaption, increasing sensitivity by changing sensor gain or ISO is a matter of seconds.
All this allows a camera to record a much brighter image with more color and detail.

Canon EOS 6D, Sigma 35mm f/1.4 ART,
8s @ ISO 6400, f/1.4
Beyond single exposures
Today, quality astrophotography is hardly ever done with single exposures. Several techniques are used to improve image quality.
A common technique is to capture the foreground and the sky separately. Longer foreground exposures allow stopping down the lens for more depth of field and lowering the ISO results in more dynamic range and stronger colors.
100s @ ISO1600, f/2


Stacking
Stacking several identical exposures is used to increase signal-to-noise ratio. The resulting image has more detail and less noise, thus allowing stronger processing. Sometimes, focus stacking is used to increase the depth of field of the foreground image even more.
Tracked skies
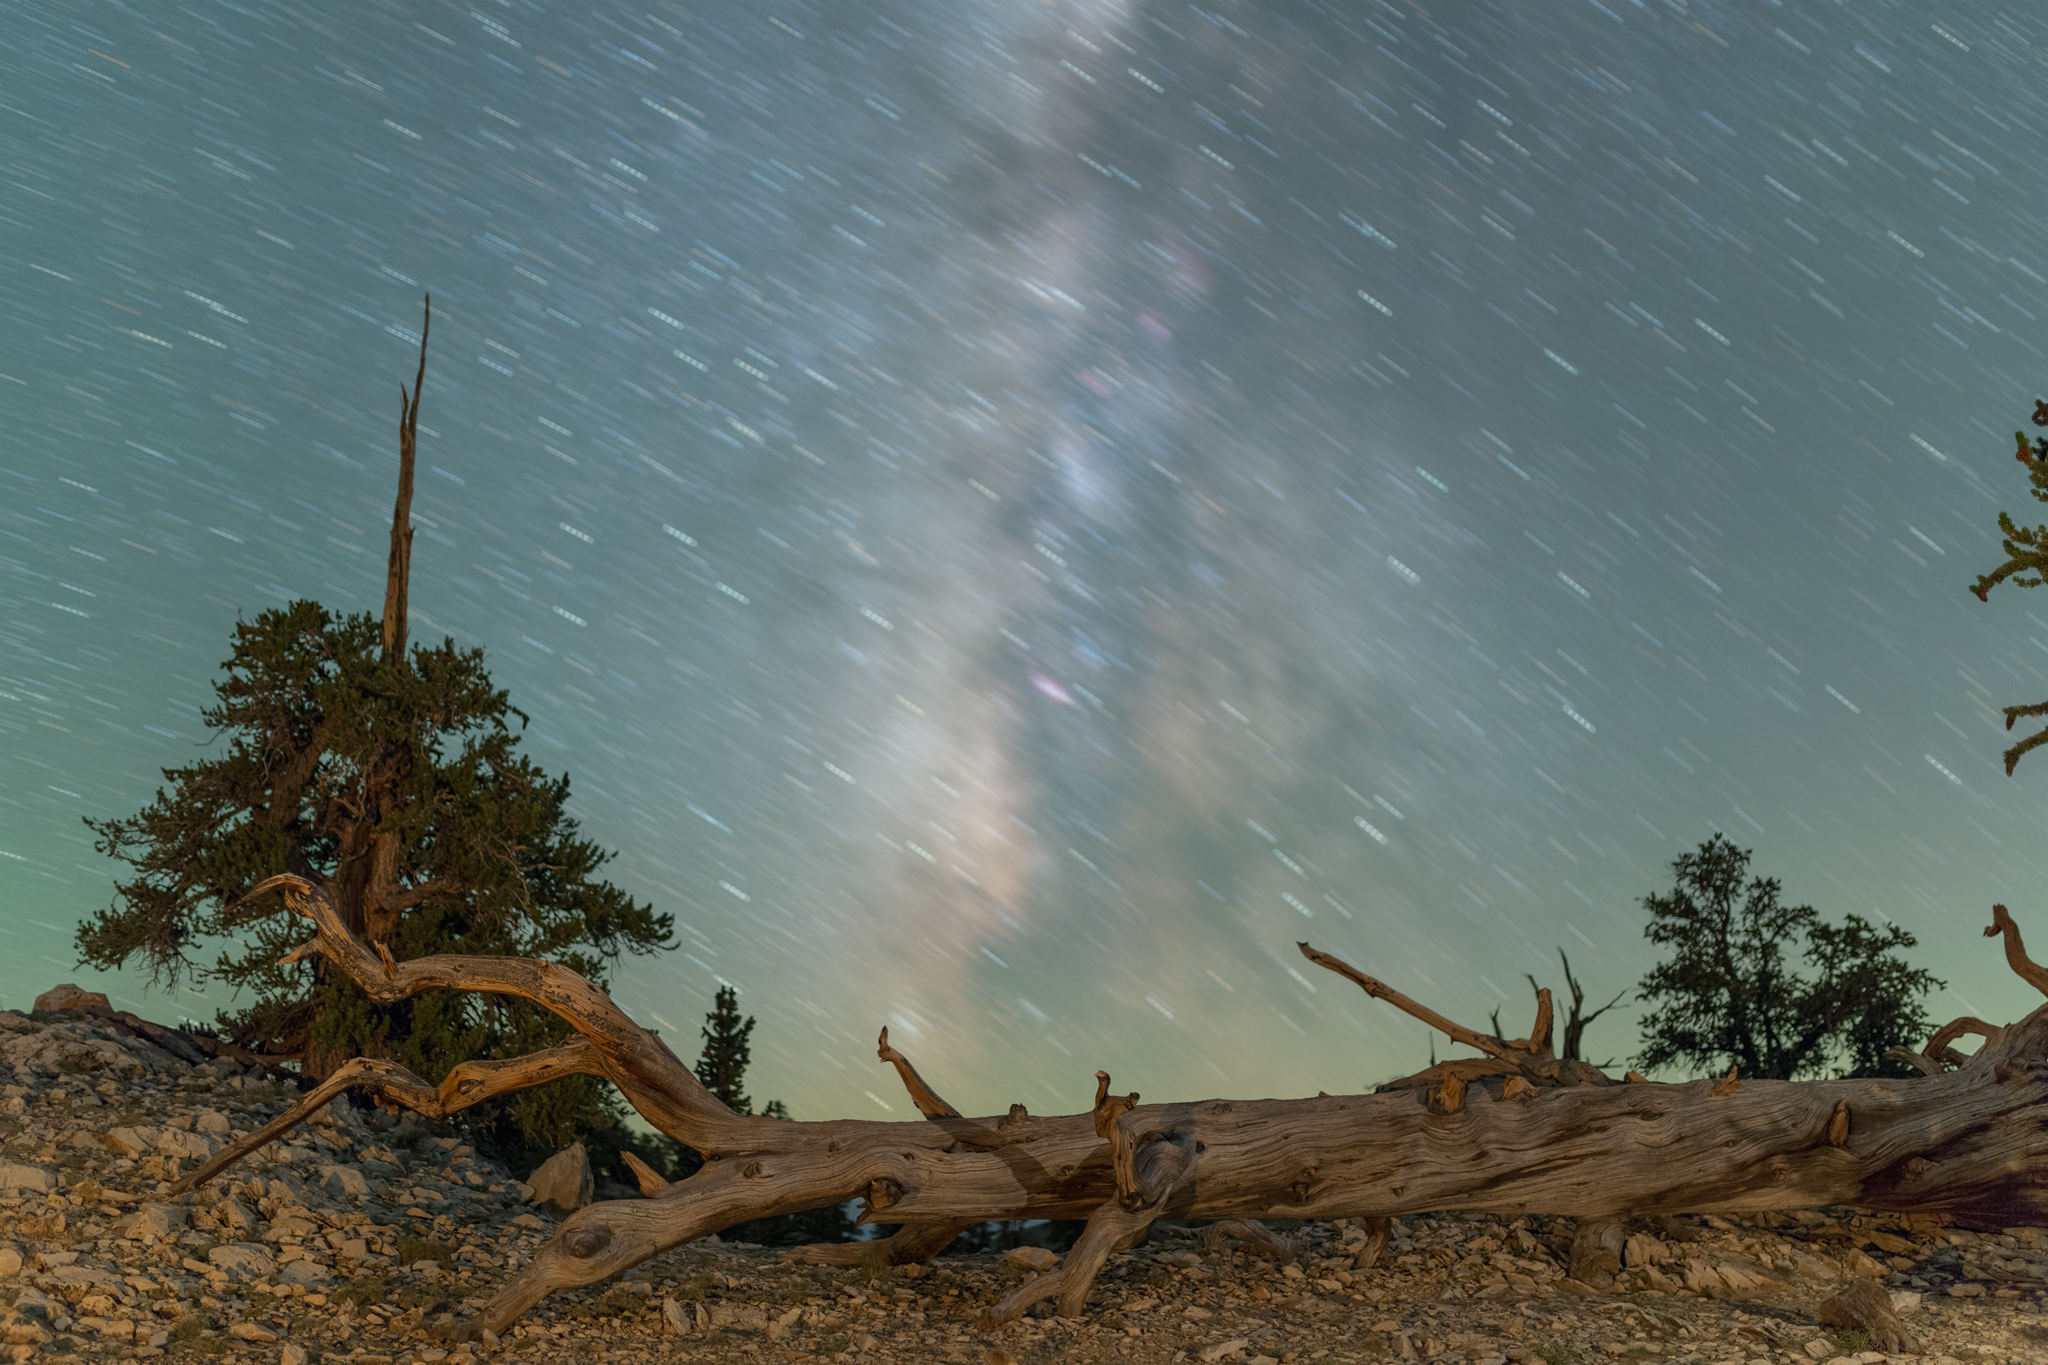
For the sky exposures, the same techniques are used to increase image quality. To avoid star trailing caused by the longer exposures, a tracking mount has to be used. Of course, tracking the stars will result in a blurred foreground.

60s @ ISO1600, f/2

Blending sky and foreground
Now, the tracked sky is merged with the untracked foreground. This blending can be difficult because the blurred foreground from the tracked sky image will be visible along the horizon and behind foreground features sticking up into the sky. There are various solutions for solving this problem, but that’s a topic on for another article…
As a final step, both the sky and foreground are processed to match in brightness and color. How much processing is done, depends on the preferences of the photographer, but for me it is important that nothig is added or removed.


I have been enjoying learning So Much more about all you have shared via these informing articles you’ve written! Thank you for All your time sharing this information with us! REALLY Appreciate..! I have had a Canon EOS MARK111 5D, for years! It has been ‘worn out’ 😳 over the years..from my love of photography ETC and it’s time to replace it.! I am considering another Canon EOS…I enjoy photographing the sunrise and sunset along with the moon, the same way…along with the night sky..more than anything.! Is there any ‘particular’ camera you would recommend..with this little bit of information? There are so many more cameras ‘out there’ now, than just upgrading to the next level up from the one I had.! Would appreciate your opinion and any options. Thank You..😃
LikeLike
Considering that you already own Canon lenses, I would definitely recommend sticking to the brand. With your preferred photographic subjects, a full frame sensor makes sense. When replacing the camera, I’d also recommend to switch to mirrorless, as this opens up the possibility to use the newest generation of RF-mount lenses, while you still can use the EF-mount lenses with an EF-EOS R adapter. The exact body depends on your budget, but I would mainly look at two options:
– the EOS-R. As a first-generation mirrorless RF-mount camera, it lacks some newer features, like IBIS or the latest autofocus technology, but it still is an excellent camera and can be found at a very competitive price.
– the EOS-R6 mark ii. It has a very good 24MP sensor with IBIS and Canon’s state of the art autofocus system, a dual memory card slot, and the ability to capture uncropped 4K video. Those features are certainly worth the higher price if you are able and willing to pay it.
LikeLike
Thank you Ralf! I ‘have’ always had Canon’s! I am researching about these cameras you mentioned now. Hoping my lens from my MARK111 5D will fit the new camera. Appreciate the info. Cindy
LikeLike
All EF lenses work nicely on the new mirrorless mount with an EF-EF-EOS R adapter.
LikeLike